Learn to Strikethrough Text in Google Docs (Updated May 2021)
While Google Docs might seem a bit unfamiliar, once you start using it, you can easily figure out everything in a few days, if not hours. I find it easier to use than most word processors like Microsoft Word. And while it’s not as feature-rich, it has got all the basics covered. With that said, let’s get into our tutorial, shall we?
Strikethrough Text in Google Docs on Web/ Desktop
Strikethrough Text Using Format Menu
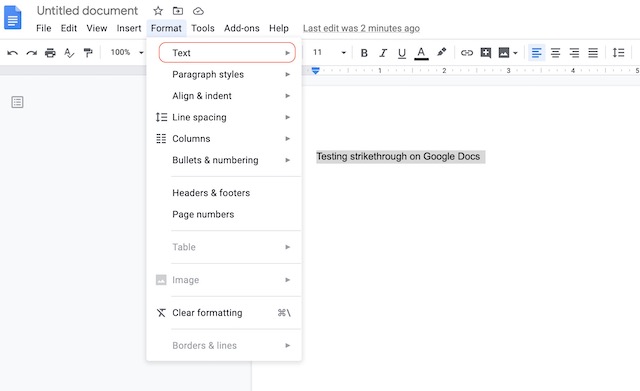
Select the text that you want to strikethrough and click on ‘Format’ in the menu bar.
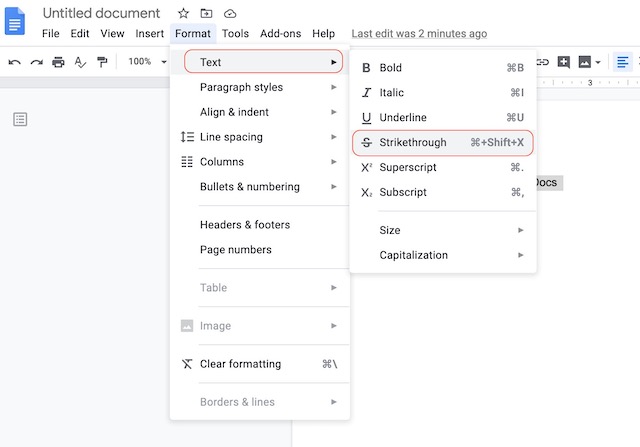
Now, hover over the ‘Text’ option and click on ‘Strikethrough’.
That’s it. You have now applied strikethrough on the selected text as shown below.
Strikethrough Text Using Keyboard Shortcut
If you want to make the process faster, remember the below keyboard shortcuts for applying strikethrough in Google Docs: On macOS: Command + Shift + X On Windows: Alt + Shift + 5
Strikethrough Text in Google Docs App on Android and iOS
The process looks slightly different in the Google Docs app on Android and iOS. You do not have a menu bar on your mobile phone, but Google has still managed to pack all essential features into the Docs app. So, here are the steps you need to follow to strikethrough text in Google Docs on Android and iOS:
Android
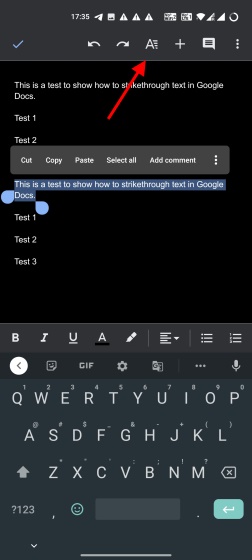
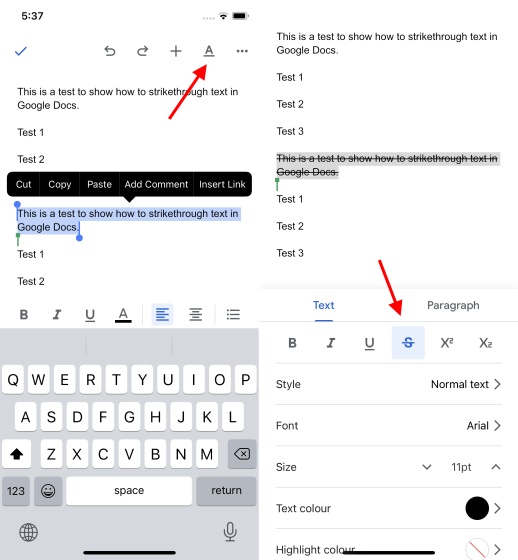
Open the document in Google Docs on your Android phone, and select the text you want to strikethrough. Now, tap on the ‘Format’ button (letter A with four lines) at the top right corner.
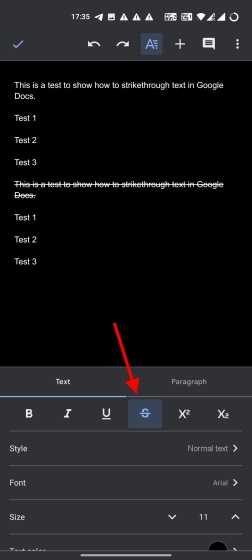
Then, from the menu that appears, tap on the ‘Strikethrough’ button. And voila, you have successfully applied strikethrough on the selected text.
iOS
The steps to strikethrough text in the Google Docs app on iOS are exactly the same as Android. You need to select the text you want to cross out, tap on the ‘Format’ button, followed by the ‘Strikethrough’ button from the menu.
Other Formatting Shortcuts for Google Docs
Whenever you forget a keyboard shortcut, you can use the same “Format” menu to apply the required style to your text. That said, it will be a lot easier if you remember some of the most commonly used keyboard shortcuts. Most of them are similar to the ones on Microsoft Word, so you should not have any problems.
Bold Text: On macOS: CMD + B On Windows: Ctrl + B Italicize Text: On macOS: CMD + I On Windows: Ctrl + I Underline Text: On macOS: CMD + U On Windows: Ctrl + U Superscript Text: On macOS: CMD + . On Windows: Ctrl + . Subscript Text: On macOS: CMD + , On Windows: Ctrl + , Increase Font Size: On macOS: CMD + Shift + > On Windows: Ctrl + Shift + > Decrease Font Size: On macOS: CMD + Shift + < On Windows: Ctrl + Shift + < Paste without formatting: On macOS: CMD + Shift + V On Windows: Ctrl + Shift + V
Those are some of the commonly used shortcuts that I think will help you a lot. You can view the list of supported keyboard shortcuts by pressing Ctrl + / (Windows, Chrome OS) or CMD + / (macOS). If you want to learn all the relevant keyboard shortcuts, head over to Google’s documentation on the same.
Easily Apply Text Formatting in Google Docs
Google Docs has changed the way we use word processors. Instead of bringing a plethora of features that 90% of people will never use, it brings a clean writing experience that makes everything easier. Yes, it might take you a few days to get acclimated to some of the features of the software, but that’s worth it. Do you use Google Docs? Let us know in the comments below.
