Find Your IP Address on Windows or Mac (2021)
Windows, in particular, offers a whole bunch of ways to find your local (internal) IP address, including using the command prompt and the PowerShell. We will detail all the methods in this article. We will also tell you about third-party websites that help you find the IP address of your connected devices. So without further delay, let’s see how you can find the IP address on your Windows 10 and Mac computer.
Public (or External) IP Address vs Local (or Private) IP Address
Before you learn about how to find your IP address (Internet Protocol Address), it’s imperative to know that there are two different types of IP addresses for any connected device. One is the Public IP (could be either Static or Dynamic) assigned by your ISP (Internet Service Provider), and it is the same for all devices using that connection. The other is Local IP, which varies from one device to another. Unlike Public IP, it is your router that defines the Local IP. It assigns a different network identifier to each device on the network, such as your computers, phones, tablets, etc. While your Public IP is visible to every website you visit (unless you are using a VPN or proxy), your local IP is more private because it cannot be seen outside of your private (home or office) network. Generally, ‘IP Address’ refers to the external (public) IP, but we will show you how to find your Public IP address as well as your Local IP address on your Windows 10 and Mac computer. There are only one or two ways to find the former, while Windows offers multiple ways to check the latter.
Find Public IP Address Using Third-party Websites
There are many websites online that can show you your public IP address. You can visit these sites using a standard web browser and check your external IP. Do note that those with a Dynamic IP address will see their IP change every time they switch off their router. For folks with Static IP, your address will remain the same no matter how many times you restart your router.
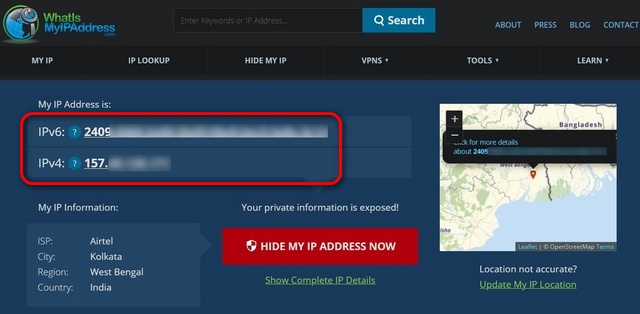
Two of the most reliable IP-checker websites include WhatIsMyIP.com (visit) and WhatIsMyIPAddress.com (visit). Go to either website and you will see your IPv4 and IPv6 addresses front and center.
Note: This method works irrespective of the device or OS and is applicable for both Mac and Windows 10 computers, as well as Android and iOS devices.
Find Local IP Address on Windows 10
There are multiple ways to find your local IP address on Windows 10. You can either do it using built-in GUI options or via the command prompt. Here are the easiest ways to find your local IP address on Windows 10:
Method 1: For Wi-Fi Connection
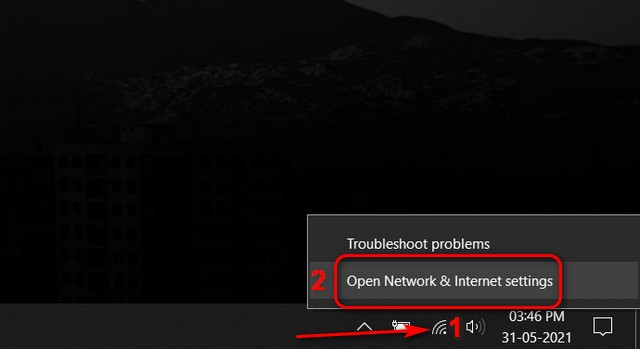
First off, right-click on the Wi-Fi icon [1] at the bottom-right corner of your Windows desktop and hit “Open Network and Internet Settings” [2].
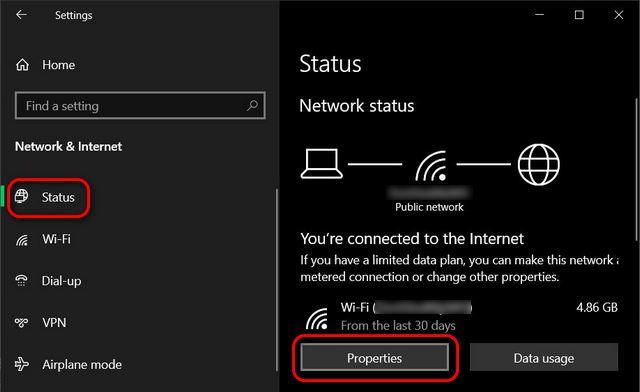
Now click on “Properties” to see more details about the wireless network you are currently connected to.
Note: You can also get to the network properties window by clicking on the Wi-Fi symbol on the Taskbar and selecting “Properties” for the network you are connected to.
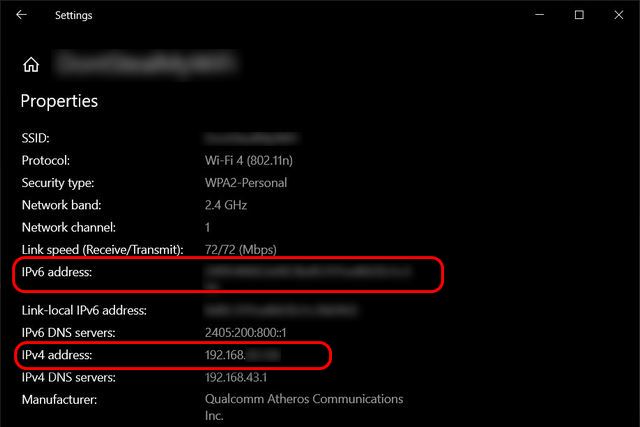
On the Wi-Fi Properties window, you will see your IPv6 and IPv4 addresses.
If you are unsure about what IPv4 and IPv6 mean, check out our detailed article on IPv4 and IPv6, where we tell you what they mean and how they differ from one another.
Method 2: For Ethernet Connection
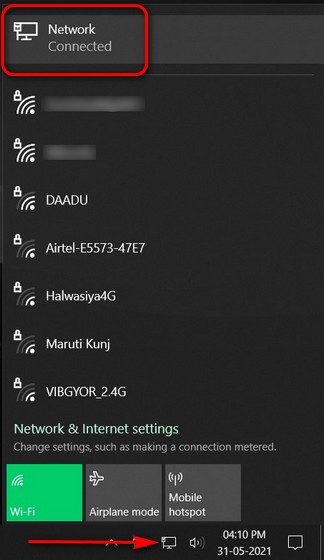
If your PC is connected directly to your modem via an Ethernet cable, you will see an Ethernet icon instead of the Wi-Fi icon on your Taskbar. Click on that and select the network you are connected to at the top.
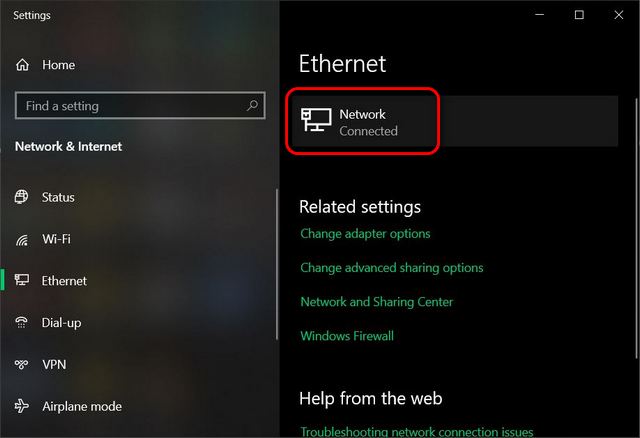
Next, on the “Network and Internet Settings” window, click on your network’s name.
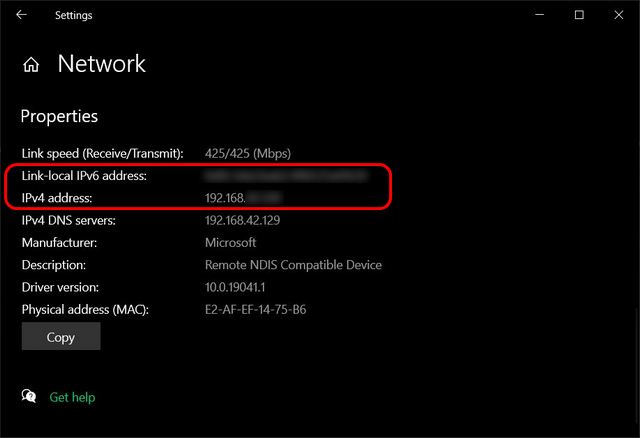
On the next page, scroll down to see your IP address under the Properties section.
Method 3: Using Command Prompt
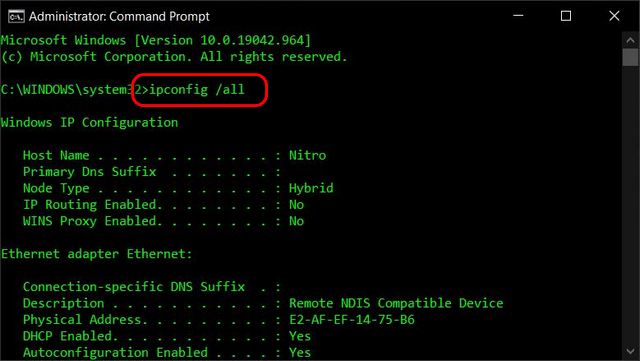
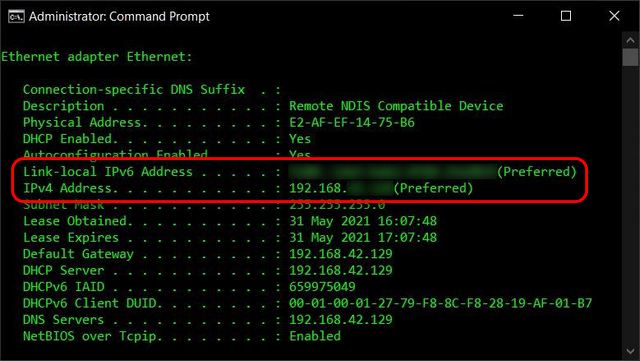
To find your IP address using the Command Prompt on Windows 10, copy+paste the following command into the Command Prompt window and hit Enter: ipconfig /all
Note: You can also use only ipconfig without the /all qualifier. Also, if you don’t know how to access the Command Prompt, use the keyboard shortcut Win key + R, and type in “cmd”, and press enter. The Command Prompt windows will open on your PC.
Windows will now display all IP information for all network adapters currently in use. Scroll down a little, and you will be able to see both your IPv4 and IPv6 addresses.
Method 4: Using Network and Sharing Center
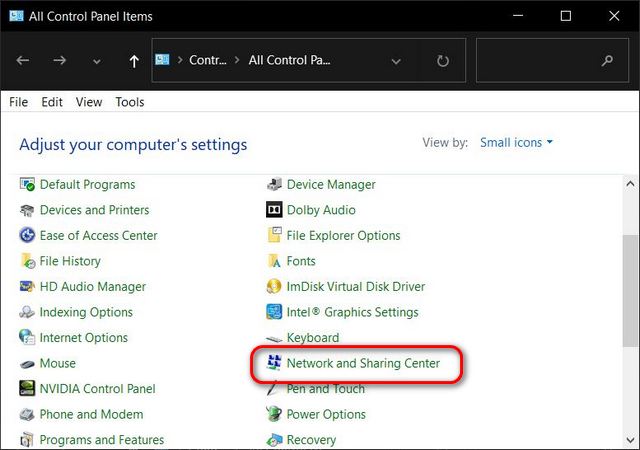
Another easy way to find your IP address on Windows is by opening the “Network and Sharing Center” from the Control Panel. By the way, you can open the Control Panel simply by searching for it using the Windows Search bar.
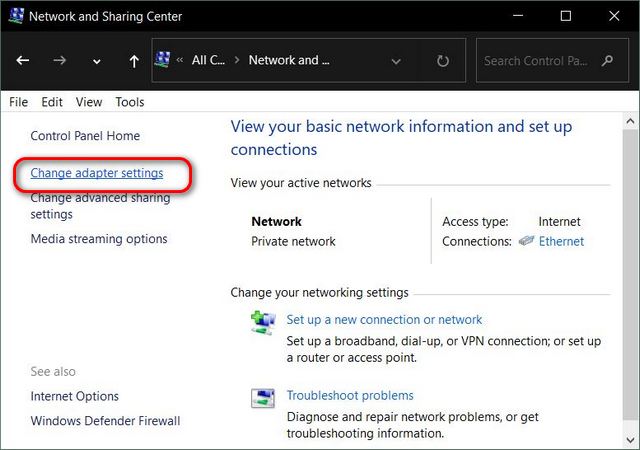
On the Network and Sharing Center window, click on “Change Adapter Settings” on the left sidebar.
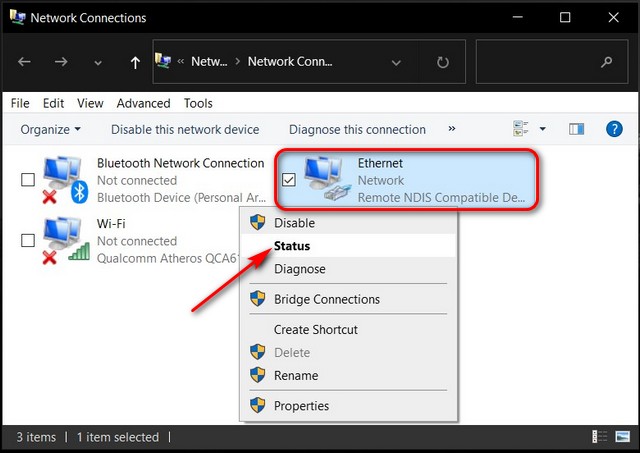
Now double-click (or right-click -> Status) on the name of the network.
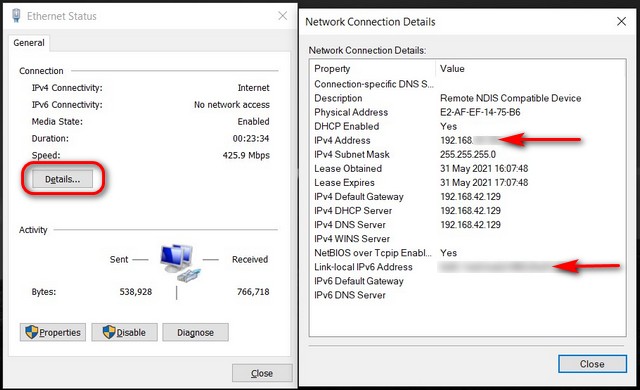
Finally, click the ‘Details‘ button to see both your IPv4 and IPv6 addresses on the next window.
Method 5: Using System Information
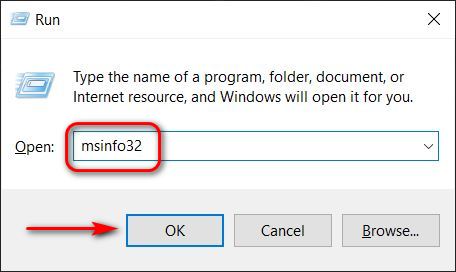
You can also check your IP address from Windows System Information. To get to the SysInfo window, open the Run box (Windows key + R), type in ‘msinfo32‘ (without quotes), and hit ‘OK‘ or Enter.
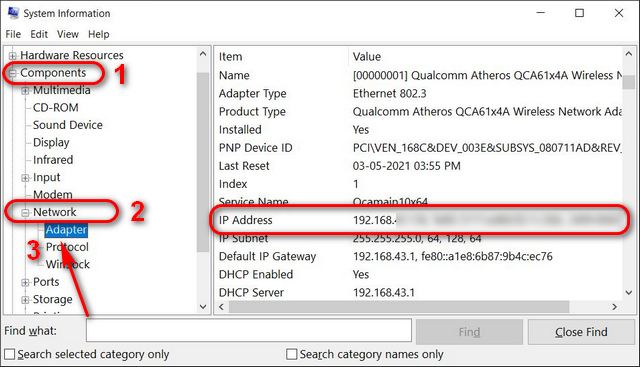
Now in the left pane of the SysInfo window, expand “Components -> Network” by clicking on the “+” signs next to them. Now select “Adapter” under Network. Finally, in the right pane, find the adapter for your current connection. Scroll down, and you will see your Local IPv4 and IPv6 addresses listed together.
Method 6: Using Windows PowerShell
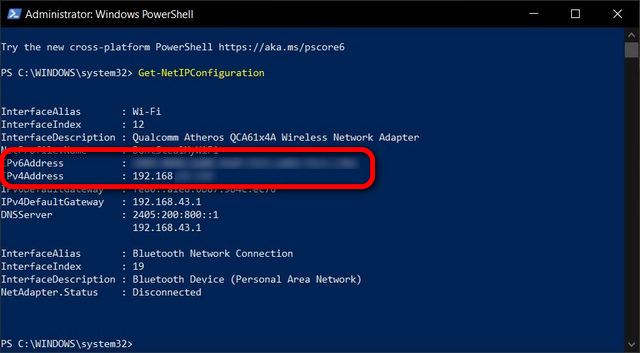
To find your local IP address using Windows PowerShell, copy+paste the following command: Get-NetIPConfiguration into the PowerShell window (open simply by searching for it in the Windows Search bar). Then press Enter. You will now see the Local IPv4 and IPv6 addresses for your Windows computer.
Note: You can also use the command gip to find your local IP address using Windows PowerShell.
Method 7: Using Windows Task Manager
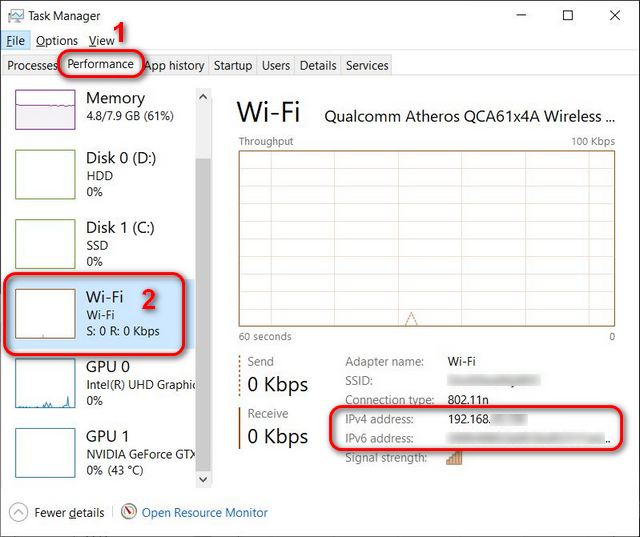
Start the Windows Task Manager (Ctrl+Shift+Esc) and go to the “Performance” tab. Now on the left sidebar, select “Wi-Fi” or “Ethernet” depending on how you are connected to the internet. You will now see both your IPv4 and IPv6 addresses at the bottom of the right pane.
Find Local IP Address on Mac, MacBook, and iMac
To find your public IP address on Mac, navigate to the IP-checker websites linked earlier in this article. As we mentioned already, they work perfectly for all desktop and mobile platforms. To find the local IP address on your Mac, use the following method:
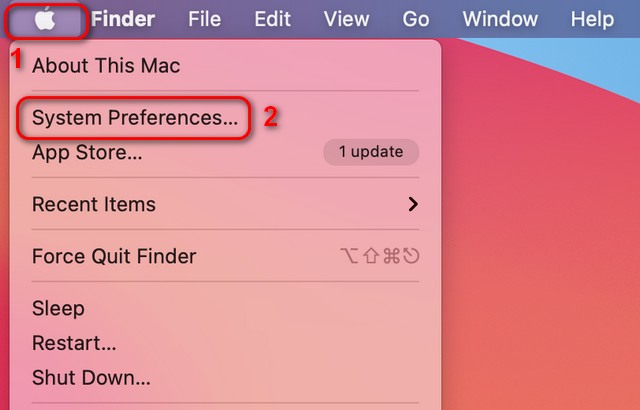
Click on the Apple icon at the top-left corner of your screen and select “System Preferences” from the drop-down menu.
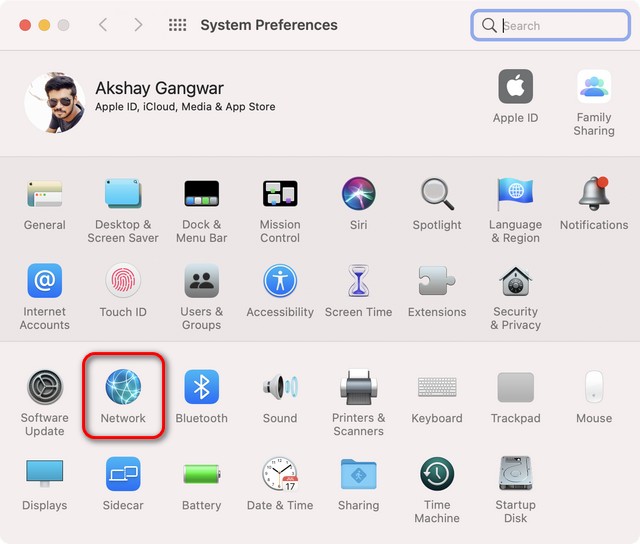
Now select “Network” on the System Preferences windows.
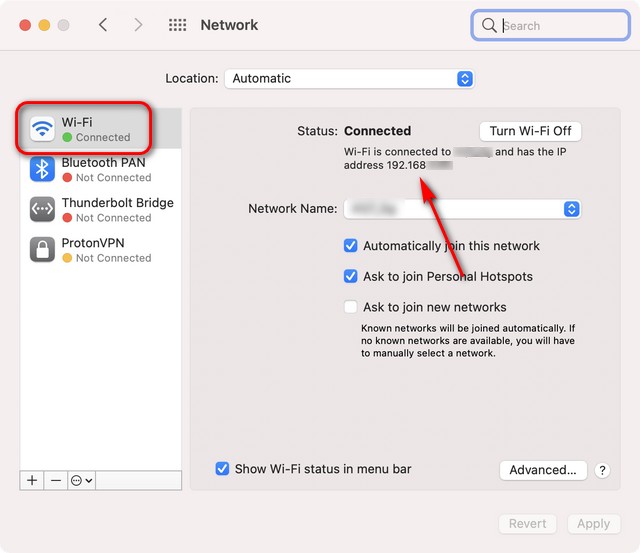
Finally, on the left sidebar, click on the network you are currently connected to (if it isn’t highlighted already). You should now be able to see your network’s name and the local IP address for your Mac device. As usual, it will almost definitely start with 192.168.x.x.
Easily Find the Internet Protocol (IP) Address of Your Computer
So now that you know how to check your IP address on Windows and Mac using third-party websites, the command prompt, the PowerShell, and a variety of other methods, go ahead and find out the public and private IP addresses for your computer. Meanwhile, if you are worried about exposing your public IP address to every website you visit on the Internet, check out the best VPN services for Windows and your Android TV. Also, check out how you can change your DNS settings on Windows and Android to prevent your ISP from snooping on your online activities.
