How to Reduce File Size of Photos on iPhone and iPad
Having tried out a number of photo compression apps, I have found three apps up to the mark – both in terms of reducing the file size of images faster and getting the work done with the needed efficiency.
Best Photo Compression Apps for iOS
Photo Compress: Very few apps are able to compress images as proficiently as Photo Compress. What’s more, it has a simple interface and reduces file size pretty fast. Apart from handling images, it’s also quite good in terms of reducing the size of videos. You can use it on your iPhone, iPad, and iPod touch running iOS 10.3 or later. Install: Free (offers in-app purchases) Compress Photos & Pictures: It has long been a reliable option for reducing the size of photos. The 4.5 stars out of 5.7K ratings also show that it has lived up to the expectation to a great extent. It’s available for free and supports iPhone, iPad, and iPod touch running iOS 10.3 or later. Install: Free (offers in-app purchases) Image Compress & Resize Easily: Whether you want to compress your images or resize them, this one can get the job done with consummate ease. Depending on your needs, you can compress your images with a specific size or percent. Do not that its free version is limited, so you will need to upgrade to the pro version to enhance the functionality. Install: Free (offers in-app purchases)
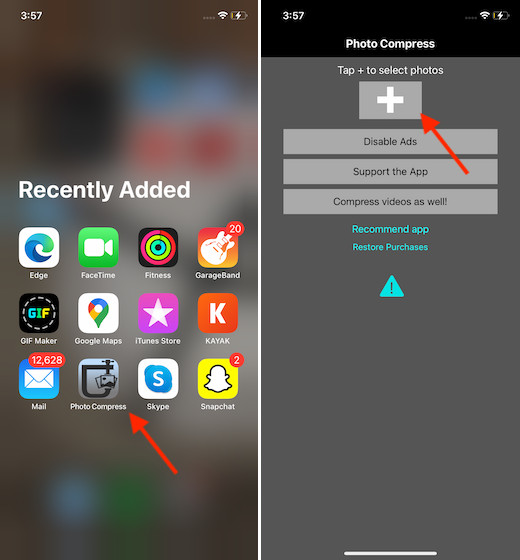
Compress Photos on iOS Using Photo Compress
In this guide, I’m going to use Photo Compress. As steps are pretty much the same for all the three apps mentioned above, you can use any app to shrink your photos.
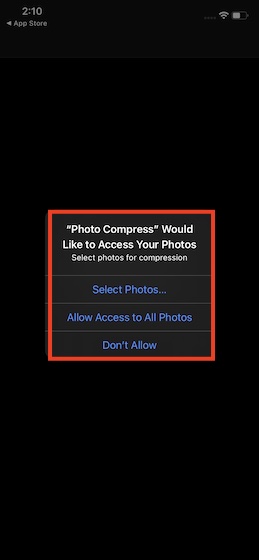
- Now, tap on OK to allow the app to access all of your photos to help it work properly.
Note:
In iOS 14 or later, you may get a popup asking for your approval to access your Photos. If you don’t want the app to have access to your entire photo library, tap on Select Photos. And if you wish to let it access all of your photos, select Allow Access to All Photos.
- Next, select the images and then tap on Done at the top center.
Note:
In iOS 14 or later, you will need to select the images again and tap on Done if you allowed the app to access only specific images.
On the next screen, you should see the original file size of images and the file size reduction in percentage. After that, tap on Continue to proceed.
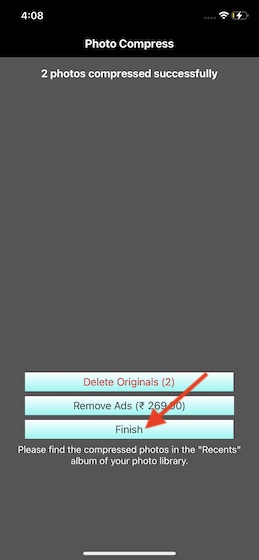
Once it has compressed the images, tap on Finish. Now, you can head over to the Photos app to check your compressed images.
Compress Photos With Ease on your iPhone or iPad
So, that’s the way you can shrink the file size of images on your iOS device. As outlined above, these apps are fully equipped to more than just fill up the void. Aside from compressing the images fast, they also do not destroy the quality. Thus, your photos will continue to look good even after the compression. Though the stock photos app has got several neat improvements like sorting out images, filtering photos, and even editing videos, it lacks a useful compression tool. Hopefully, Apple adds it sooner than later. By the way, which one of these apps have you chosen to cut down the file size of images on your device. Also, tell us about whether or not the app has lived up to your expectation.